

Melvin
Author at - allareportable.comMelvin is an expert for portable products.The site is for sharing everything about portable products for online buyers.
To fix the handle on a kitchen faucet, start by turning off the water supply and removing the handle. Then, inspect the handle and cartridge for any damage or wear.
If necessary, replace the cartridge and reassemble the handle, ensuring it is tight and secure.
Possible Causes Of A Faulty Faucet Handle
There are several reasons why your kitchen faucet handle might be malfunctioning:
1. Loose screws: Over time, the screws that hold the handle in place can become loose, causing the handle to wobble or move freely. To fix this, simply tighten the screws using a screwdriver.
2. Worn-out cartridge or valve: If the handle feels stiff or is difficult to turn, the cartridge or valve inside the faucet may be worn out. Replacing the cartridge or valve should resolve this issue.
3. Deteriorated O-ring or washer: A faulty O-ring or washer can result in leaks around the handle. To fix this, you will need to replace the O-ring or washer with a new one.
By addressing any of these underlying problems, you can easily fix a faulty kitchen faucet handle and ensure smooth operation. Remember to carefully follow the manufacturer’s instructions when making any repairs.
Tools Required For Fixing The Kitchen Faucet Handle
Tools required for Fixing the Kitchen Faucet Handle:
| Adjustable wrench |
| Screwdriver |
| Replacement parts (screws, cartridge, O-ring, washer) |
When fixing a kitchen faucet handle, you will need some tools to assist you. One essential tool is the adjustable wrench which allows you to tighten or loosen bolts as needed. A screwdriver is another imperative tool for removing screws that hold the handle in place. Additionally, you may require replacement parts such as screws, a cartridge, an O-ring, or a washer. These parts are necessary if any of them are worn out or damaged and need to be replaced. By having these tools and replacement parts on hand, you can successfully fix the handle on your kitchen faucet and restore its functionality.
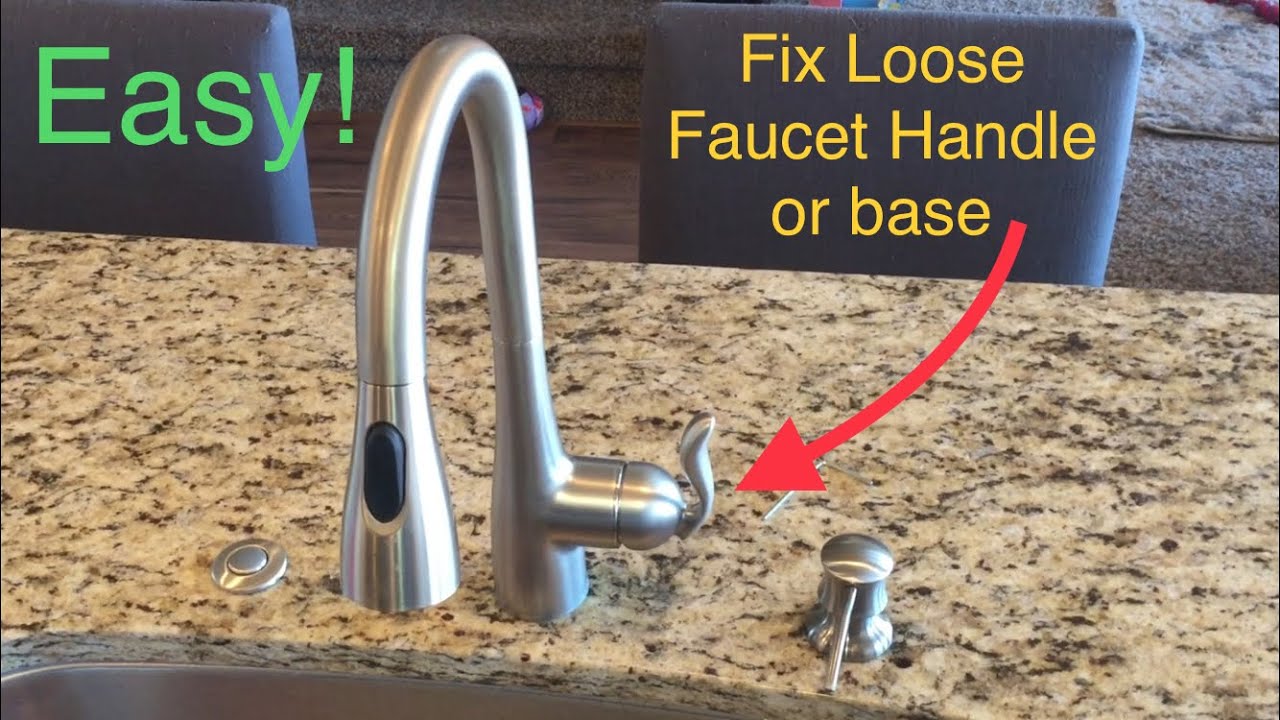
Step-by-step Guide To Fix A Loose Faucet Handle
Here is a step-by-step guide to fixing a loose faucet handle:
- Shut off the water supply to avoid any potential leaks or spills.
- Using a flathead screwdriver, gently remove the handle’s decorative cap.
- Tighten the handle screw clockwise until it feels snug.
- Reassemble the handle by placing the decorative cap back in place.
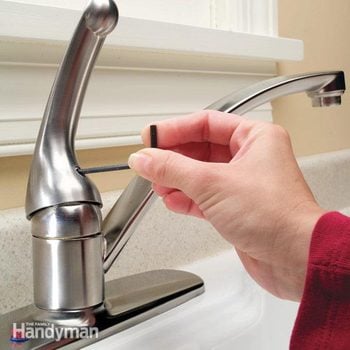
Credit: www.familyhandyman.com
How To Replace A Worn-out Cartridge Or Valve
How to Replace a Worn-Out Cartridge or Valve
To fix a handle on a kitchen faucet, you need to start by turning off the water and removing the handle. This is essential to prevent any water leaks or accidents during the repair process. Once the water is off, you can locate and remove the cartridge or valve that is causing the handle to malfunction. This step may require some tools, such as pliers or a wrench, to successfully remove the old cartridge or valve.
After removing the old cartridge or valve, you can install the new one. Make sure to carefully follow the manufacturer’s instructions and ensure that the new cartridge or valve is securely in place. Once the installation is complete, you can reinstall the handle. Test the faucet to ensure it is working properly and check for any leaks. By following these steps, you can fix a handle on your kitchen faucet and restore its functionality.
Fixing A Leaking O-ring Or Washer
If you have a leaking kitchen faucet handle, you can easily fix it by addressing the issue with the O-ring or washer. Start by shutting off the water supply to avoid any mess. Then, disassemble the faucet handle by removing any decorative caps or handles. Inspect the O-ring or washer for any signs of damage or wear. If you notice any issues, replace the faulty component with a new one.
Make sure to choose the correct size and type to ensure a proper fit. Once the replacement is done, reassemble the handle by reversing the steps taken during disassembly. Turn on the water supply and test the faucet to see if the leak has been resolved. By following these steps, you can fix the handle on your kitchen faucet and prevent further leaks.
Regular Maintenance Tips To Avoid Handle Issues In The Future
To make sure your kitchen faucet handle functions properly and to avoid any future issues, regular maintenance is important. Cleaning and lubricating the handle on a regular basis is vital to keep it in good working condition. Check and tighten the screws that attach the handle periodically to ensure they do not become loose over time. It is also important to clean and inspect the cartridge or valve that controls the flow of water.
Removing any build-up or debris will help prevent handle issues in the future. Finally, ensure that proper water pressure is maintained in your kitchen faucet to avoid any strain on the handle mechanism. By following these tips and incorporating regular maintenance into your routine, you can keep your kitchen faucet handle in optimal condition for years to come.
Frequently Asked Questions For How To Fix Handle On Kitchen Faucet
How Do I Fix A Loose Handle On My Kitchen Faucet?
To fix a loose handle on your kitchen faucet, first, locate the screw that holds the handle in place. Use a screwdriver to tighten the screw until the handle is secure. If the handle is still loose, you may need to replace the screw or check for any other underlying issues with the faucet’s mechanism.
Why Is My Kitchen Faucet Handle Spinning?
If your kitchen faucet handle is spinning, it may be due to a loose or worn-out cartridge inside the faucet. To fix this, turn off the water supply, remove the handle, and inspect the cartridge. If it is loose or damaged, replace it with a new one.
This should prevent the handle from spinning.
How Can I Repair A Broken Handle On My Kitchen Faucet?
To repair a broken handle on your kitchen faucet, start by purchasing a replacement handle that matches the make and model of your faucet. Remove the old handle by loosening the set screw or nut that holds it in place.
Install the new handle, tighten the screw or nut, and test the faucet for proper functionality.
What Tools Do I Need To Fix A Handle On A Kitchen Faucet?
To fix a handle on a kitchen faucet, you will need a few basic tools such as a screwdriver (flathead or Phillips, depending on the type of screw used), an adjustable wrench, and possibly a pair of pliers. These tools will help you tighten or replace the handle and any associated screws or nuts.
Conclusion
To conclude, fixing a handle on a kitchen faucet may seem like a daunting task, but with the right tools and steps, it can be easily accomplished. By following the instructions provided in this blog post, you can save both time and money by avoiding the need for professional assistance.
Remember to exercise caution and patience throughout the process to ensure a successful repair. Now you can confidently tackle any handle-related issues with your kitchen faucet!
Melvin is an expert for portable products.The site is for sharing everything about portable products for online buyers.