

Melvin
Author at - allareportable.comMelvin is an expert for portable products.The site is for sharing everything about portable products for online buyers.
To make a kitchen island with Ikea cabinets, assemble the cabinets and secure them together.
Planning Your Kitchen Island With Ikea Cabinets
Planning your kitchen island with Ikea cabinets starts with measuring your space and determining the ideal size for your island. Take accurate measurements of the area where you plan to install the island to ensure it fits perfectly in your kitchen. Next, consider the different Ikea cabinets available and choose the ones that best suit your island design. There are various options to choose from, including base cabinets, wall cabinets, and drawers.
Sketching out your island layout is an essential step in the planning process. Consider the functionality and flow of your kitchen, as well as any additional features you want to incorporate into your island. This could include a sink, a cooktop, or extra storage space. Take the time to carefully plan out your layout to ensure everything is positioned in the most convenient and efficient way.
Assembling The Ikea Cabinets For Your Island
htmlGathering your tools and materials:
- Ikea kitchen cabinets
- Screwdriver
- Drill
- Measuring tape
- Level
- Clamps
- Mounting brackets
Step-by-step instructions for assembling the Ikea cabinets:
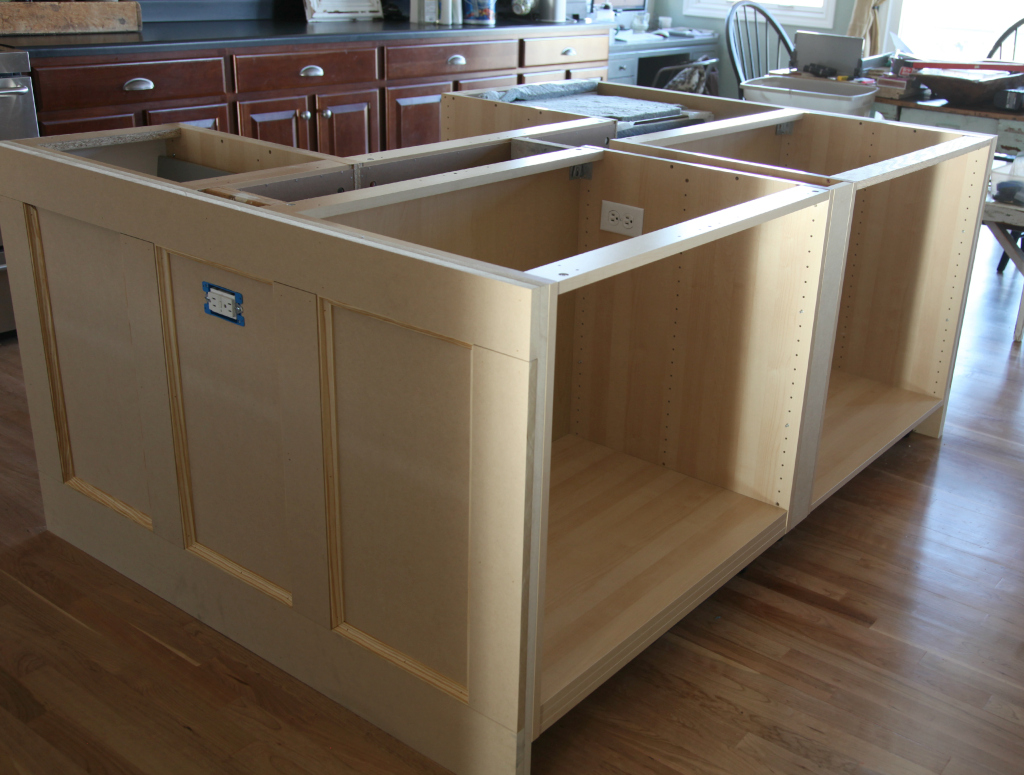
- Assemble the base cabinets according to the instructions provided by Ikea.
- Attach the cabinets together using the included hardware.
- Secure the cabinets to the floor and wall using screws and mounting brackets for stability.
- Install the countertop on top of the cabinets, ensuring it is level and securely fastened.
- Add any additional features or accessories, such as drawers, shelves, or lighting.
Tips for ensuring a sturdy and secure construction:
- Double-check all measurements and make sure the cabinets are level before securing them.
- Use clamps to hold cabinets together during assembly for added stability.
- Follow the manufacturer’s instructions for installing mounting brackets.
- If necessary, reinforce the cabinets with additional screws or brackets for extra strength.
- Regularly inspect and tighten any loose screws or fasteners to maintain the integrity of the island.
Installing And Customizing Your Ikea Cabinet Island
Preparing your kitchen floor for the island installation:
Before you start installing your Ikea cabinets to create a kitchen island, it is important to prepare your kitchen floor properly. Clear the area where the island will be placed and ensure that the floor is clean and level. You can use a leveler to check for any unevenness. If there are any gaps or uneven spots, consider using self-leveling compound to create a smooth surface.
Attaching the cabinets together and securing them to the floor:
Once your floor is prepared, it’s time to attach the Ikea cabinets together to form the island structure. Begin by assembling the cabinets according to the instructions provided by Ikea. Then, secure them together using screws or other fastening methods. To ensure stability, it is essential to secure the cabinets to the floor. This can be done by using a combination of adhesive, brackets, or screws. Make sure to follow the recommended guidelines for securing the cabinets to ensure a sturdy and safe kitchen island.
Adding personal touches and custom features to your island design:
Now that your Ikea cabinet island is installed, it’s time to add your personal touches and custom features to make it uniquely yours. Consider adding decorative moldings or trim to enhance the appearance. You can also choose to paint or stain the cabinets to match your kitchen’s aesthetic. Additionally, think about adding functional elements such as a butcher block top, a wine rack, or open shelving for additional storage. The possibilities are endless when it comes to customizing your Ikea cabinet kitchen island to suit your style and needs.
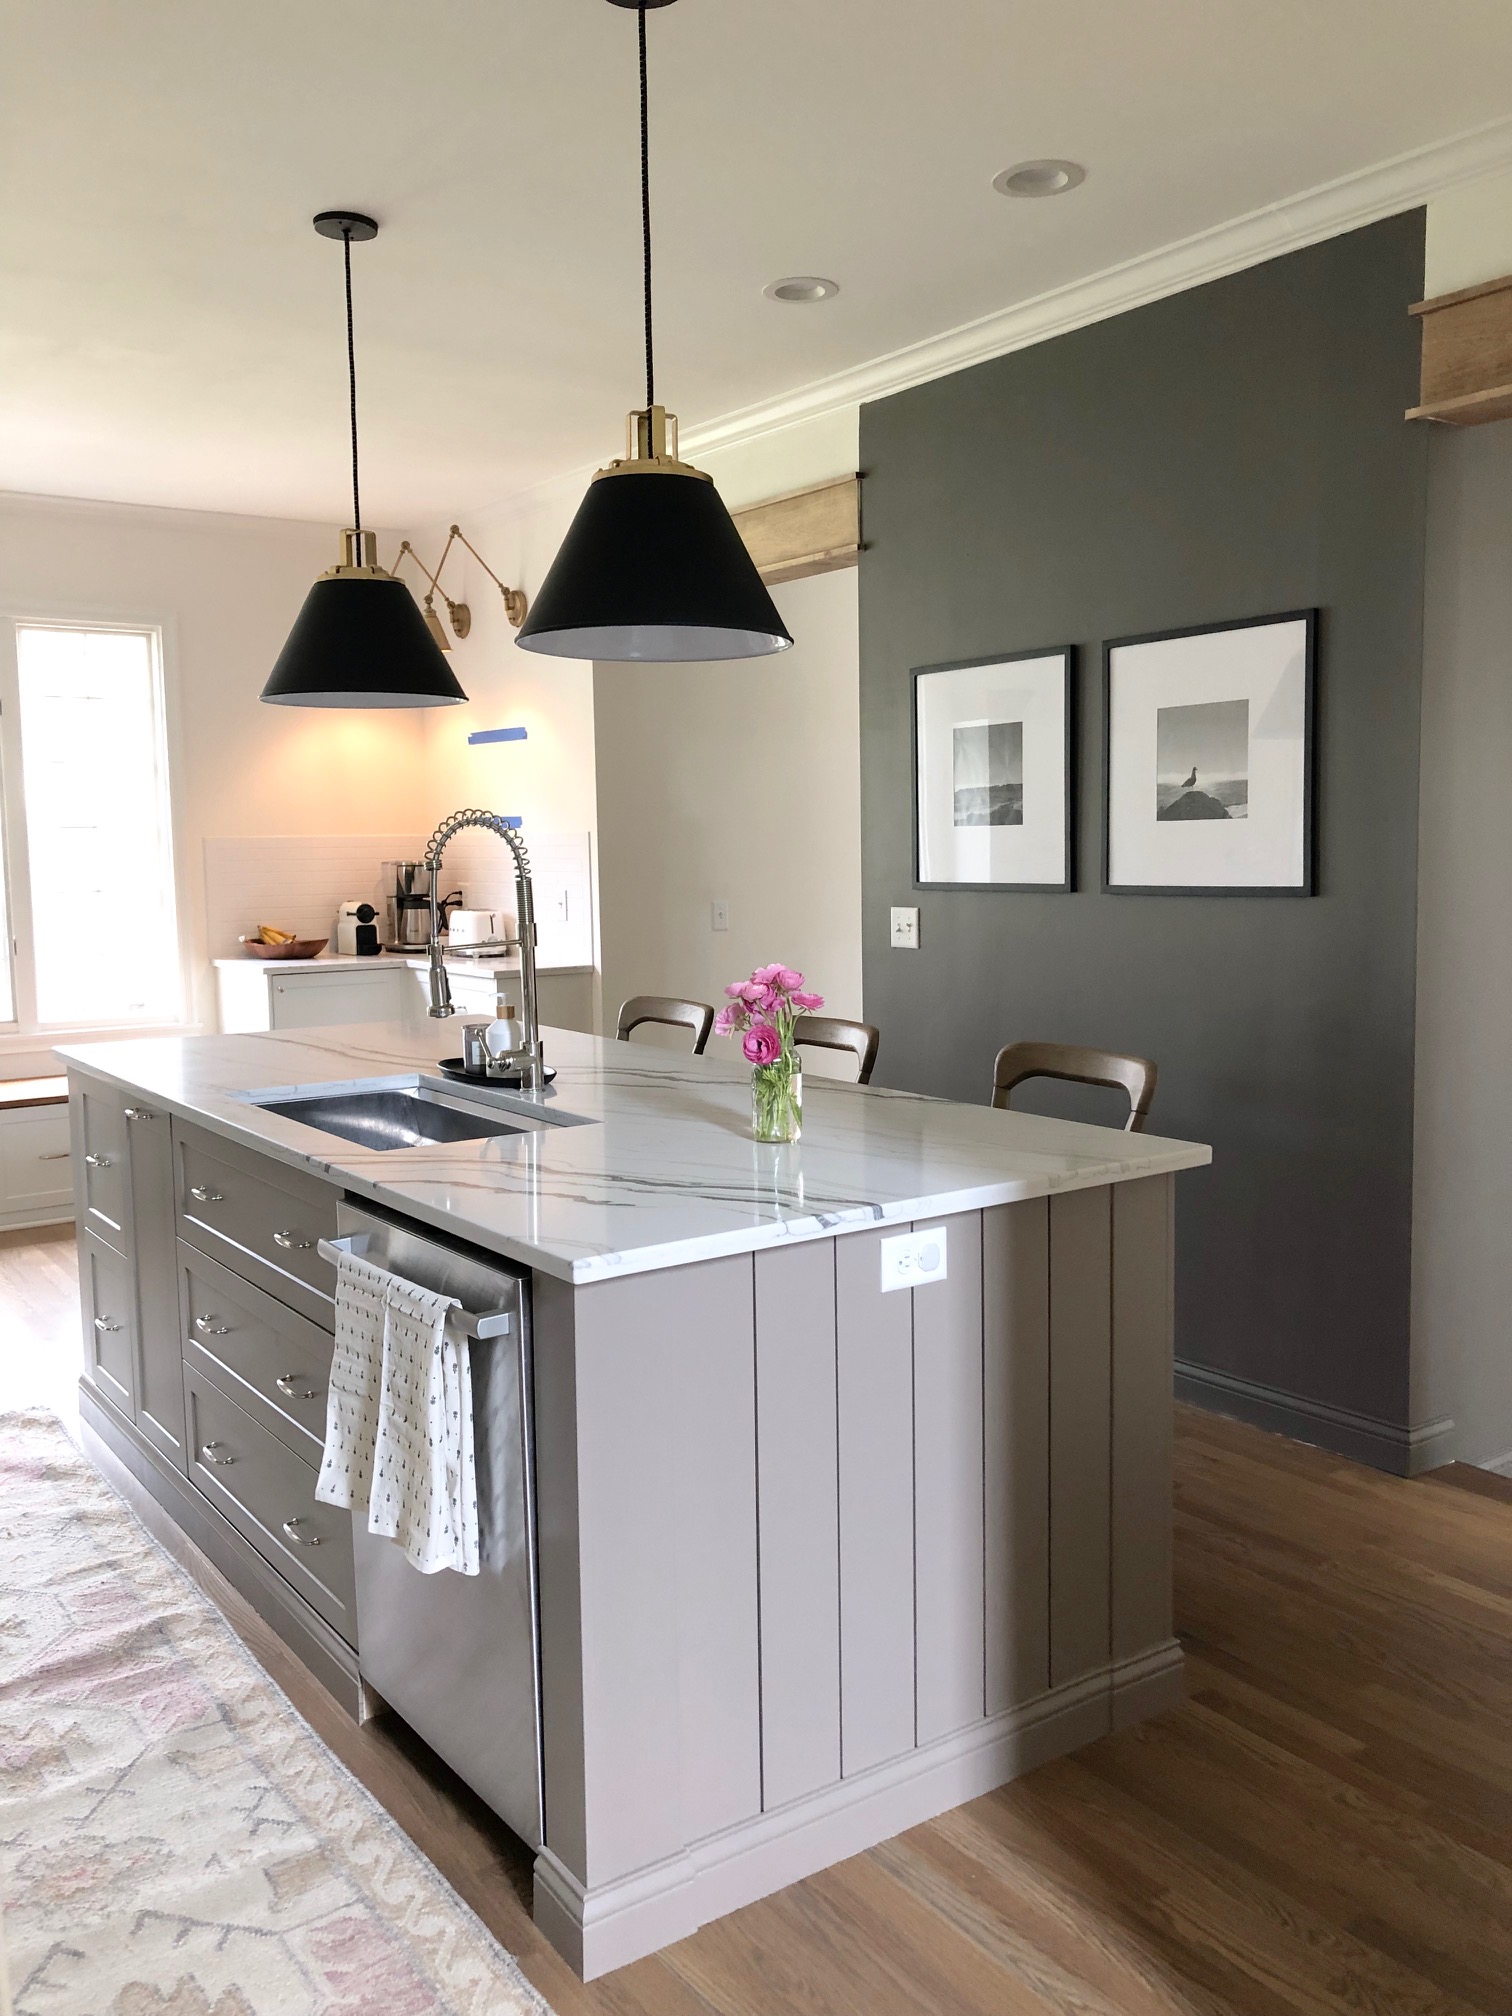
Creating A Functional And Stylish Kitchen Island
html
Creating a functional and stylish kitchen island starts with choosing the right countertops and backsplashes that complement your cabinets. The combination of materials and colors can enhance the overall aesthetic appeal of your island.
To make your island more practical, consider installing a sink, dishwasher, and other appliances. This will not only make meal prep and clean-up more convenient but also add functionality to your kitchen.
Another way to maximize storage space is by incorporating creative solutions. Utilize pull-out shelves, hidden drawers, and vertical dividers to make the most of your island’s storage capacity. This will help keep your kitchen organized and clutter-free.
By following these tips, you can create a kitchen island using Ikea cabinets that not only looks stylish but also adds functionality to your space. Make sure to plan the layout and design carefully to ensure a seamless integration with the rest of your kitchen.
Enhancing The Look And Functionality Of Your Island
When creating a kitchen island with Ikea cabinets, there are various ways to enhance its look and functionality. One option is to paint or stain the cabinets to match your kitchen aesthetic. This allows you to customize the island’s appearance and seamlessly integrate it into your overall design.
Another way to elevate your island is by adding decorative elements such as trim, molding, or paneling. These details can add character and sophistication to the island, making it a focal point in your kitchen.
Additionally, incorporating lighting solutions can greatly improve the functionality of your island. Consider installing pendant lights or recessed lighting to ensure a well-lit workspace. This enables you to efficiently prepare meals and perform other kitchen tasks on the island.
By carefully considering these options, you can transform your Ikea cabinets into an impressive kitchen island that not only looks great but also enhances the functionality of your space.
Credit: jeanneoliver.com
Maintaining And Caring For Your Ikea Cabinet Island
htmlRegular cleaning and maintenance of your Ikea cabinet island is crucial to keep it looking fresh and new over time. Here are some tips to help you maintain and care for your cabinets and countertops:
- Regularly wipe down the cabinets and countertops with a mild cleaner and a soft cloth to remove any dirt or stains. Avoid using harsh chemicals that can damage the material.
- Clean spills immediately to prevent any long-term damage or staining on the surface. Use a damp cloth or sponge to gently remove the spill.
- Avoid using abrasive materials or scrub brushes that can scratch the cabinets or countertops. Instead, opt for non-abrasive cleaning tools.
- Inspect the cabinets regularly for any signs of wear and tear such as loose hinges or handles. Tighten any loose screws or replace damaged hardware as needed.
- Repair any scratches or dents on the cabinets or countertops using appropriate touch-up kits or repair solutions recommended by Ikea.
- Keep the cabinet surfaces protected by using trivets or cutting boards for hot pots and pans, and avoiding placing sharp objects directly on the surface.
- Apply a protective sealant to the countertops to prevent stains and damage.
- Regularly dust and clean the cabinet interiors to keep them free from debris and maintain their functionality.
- Avoid excessive moisture by using proper ventilation in the kitchen to prevent any damage to the cabinets.
| Regular maintenance | Handling repairs | Keeping it fresh |
|---|---|---|
| – Wipe down with mild cleaner | – Inspect for wear and tear | – Apply protective sealant |
| – Clean spills immediately | – Repair scratches and dents | – Regular dusting and cleaning |
| – Avoid abrasive materials | – Tighten loose hardware | – Prevent excessive moisture |
Frequently Asked Questions On How To Make A Kitchen Island With Ikea Cabinets
Can I Use Ikea Cabinets To Build A Kitchen Island?
Yes, Ikea cabinets can be used to build a kitchen island. Ikea offers a wide range of cabinet options that can be customized to create a functional and stylish kitchen island. By following a few simple steps and using some basic tools, you can easily transform your Ikea cabinets into a beautiful kitchen island.
How Do I Start Building A Kitchen Island With Ikea Cabinets?
To start building a kitchen island with Ikea cabinets, first, measure the space where you want to place the island. Then, choose the style and size of the cabinets that will fit your needs. Assemble the cabinets according to the instructions provided by Ikea.
Finally, attach the cabinets together, add a countertop, and finish it off with any additional accessories or features you desire.
What Tools And Materials Do I Need To Make A Kitchen Island With Ikea Cabinets?
To make a kitchen island with Ikea cabinets, you will need a tape measure, a level, a drill, screws, a screwdriver or drill bit, a hammer, a saw, a countertop, and any additional accessories or features you want to add.
Make sure to have all the necessary tools and materials before you start the project to ensure a smooth and efficient construction process.
Conclusion
Creating a kitchen island with Ikea cabinets is a practical and cost-effective way to enhance your kitchen space. By following the step-by-step instructions and utilizing the customizable features of Ikea cabinets, you can achieve a functional and stylish island that meets your specific needs.
From extra storage to additional countertop space, this DIY project allows you to maximize your kitchen’s potential without breaking the bank. So, why wait? Start transforming your kitchen today with Ikea cabinets and enjoy the benefits of a customized kitchen island.
Melvin is an expert for portable products.The site is for sharing everything about portable products for online buyers.